Hi! This is gonna be a short one I hope.
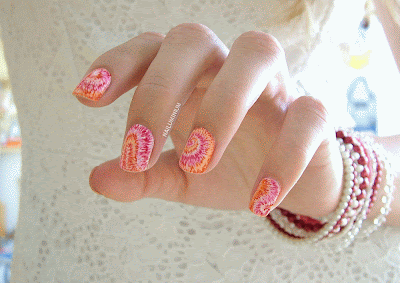
I wanted my nails to match my outfit and I ended up with this. You can see the outfit in second photo's background.
Friday 27 September 2013
Monday 23 September 2013
Outlined Marble keeps glowing
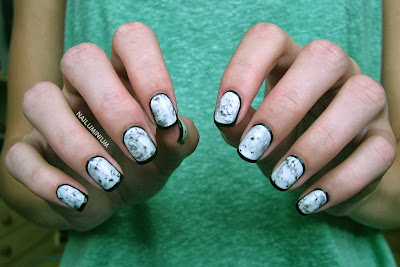
Hello there, finally I have time to write. I'm back to neutral colours, black and white today. There were two things on my mind when I planned this: glowing polish and outlining. But outlining pure white space would be far too simple for me and that's why I decided to go with acrylic watercolor effect, also used in Outlined Galaxy and Don't Panic manis.
I painted my nails Gabriella Salvete 148 white and then two coats of Essence 18 fly firefly fly glow in the night top coat before adding the black (black topped with this glowing top coat looks off, it ruins the contrast). Then I did this acrylic-watercolor technique and when that dried, I outlined my nails with black acrylic paint. Everything is sealed with NYC Turbo Dry top coat.
You can see my right hand above, this time I didn't have much trouble outlining with my non-dominant hand (unlike the first time).
I even menaged to properly capture brightness of the glowing:
Yea, funny shapes.
On the other hand, both hands photos turned out rather weird. I blame the colour scheme.
To the title - don't these remind you of marble rock? They do to me.
I have one more thing to ask you: would you like to see a tutorial? Tutorial on how I do this watercolor with acrylics, cause you can find a lot of tutorials on outlining out there. Also, would you like to see a tutorial for any other of my designs? (And seriously, what preposition does tutorial come with? Tutorial on st/ tutorial for st? I wasn't able to find it on the internet.)
Bye!
Thursday 19 September 2013
Stripes and Shapes
Hi, this is a post I wrote about a month ago because I had a suspicion I won't have enough time to write posts later during the school year. In the moment I'm wearing quite unusual manicure, I think I'm going to write the post at the weekend (okay, maybe next week), be sure to check it out then. To the pre-written (surprisingly short) post...
This is one of the first manicures I have good quality pictures of and I didn't menage to publish it until now. It was originally inspired by this design by The Nailasaurus (whom I admire, by the way).
This is one of the first manicures I have good quality pictures of and I didn't menage to publish it until now. It was originally inspired by this design by The Nailasaurus (whom I admire, by the way).
Sunday 15 September 2013
Disqus Problem (no nails, I need help)
Hey, ladies! I switched to disqus and I hope you prefer this way of commenting, but I have an issue with the colour scheme. You see, the background for my disqus should be white as it is on all the other blogs I've seen, but it is grey. Grey with black letters on. OMG.
Of course I tried to find solution on the Internet, I tried to find solution on disqus Help page, but what I found didn't help me at all. Changing colour scheme in general settings just changed colour of the letters (to white) and when I wanted to change HTML, I didn't even find what I was supposed to find in the html of my blog. I feel totally stupid and useless, so I'm turning to you, lovely readers, do you have any idea what to do? An experience alike? If so, please help me.
In case I don't find a solution, should I just go along with black on grey?
(There is a huge probability I will delete this post when it is not needed anymore.)
Saturday 14 September 2013
Tie Dye Tutorial
Heey! Finally I'm bringing you the tie dye tutorial. The two pictures below are linked to the original posts.
I must admit the tutorial nail looks different from what you saw last time, but it just ends up different every time I do it, sorry!
In both designs (pink and green) I used a colour scheme of two colours and their shades, I also tried using more colours on friend's nails, but I didn't like that much.
The Process:
1. Paint your nails white. It doesn't matter what colour combo you choose, the base is always white.
2. Start with a sketch. Use the lightest colour you want in your design.
3. Add the second light(est) colour next to the first colour.
4. Add darker colours wherever it feels right. You can put it next to the two colours you have, between them or over them.
5. Keep doing n. 4.
6. Get contrast. Add more dark shades and next to (and over) them white and light shades. Seal your design with top coat.
I used acrylic paint and I don't think the result would be the same with nail polish, mostly because I get impatient working with polish. I use two brushes, striper and detailing, I bought several brushes in local craft store, they cost me 9 CZK each (about 0,30 €) and I cut them down to this size:
Additional Tips:
Usually I use the longer brush in steps 2 and 3 and the shorter in following steps.
You don't need perfectly smooth white base, you're covering it anyway.
In the green version, I added the glow in the dark top coat between steps 4 and 5 to keep the final contrast.
If you're thinking of buying acrylics but you're not entirely sure yet, stop that hesitating and get them.
Another possible result.
I guess that's it for today and for this tutorial. If you have any questions, I'll be happy to answer them.
If you recreate this sort-of-tie-dye, definitely let me know (even in the comments), I'd love to see it! :)
 |
| High on Pink Tie Dye |
 |
| Irradiated Tie Dye |
In both designs (pink and green) I used a colour scheme of two colours and their shades, I also tried using more colours on friend's nails, but I didn't like that much.
The Process:
1. Paint your nails white. It doesn't matter what colour combo you choose, the base is always white.
2. Start with a sketch. Use the lightest colour you want in your design.
3. Add the second light(est) colour next to the first colour.
4. Add darker colours wherever it feels right. You can put it next to the two colours you have, between them or over them.
5. Keep doing n. 4.
6. Get contrast. Add more dark shades and next to (and over) them white and light shades. Seal your design with top coat.
I used acrylic paint and I don't think the result would be the same with nail polish, mostly because I get impatient working with polish. I use two brushes, striper and detailing, I bought several brushes in local craft store, they cost me 9 CZK each (about 0,30 €) and I cut them down to this size:
Additional Tips:
Usually I use the longer brush in steps 2 and 3 and the shorter in following steps.
You don't need perfectly smooth white base, you're covering it anyway.
In the green version, I added the glow in the dark top coat between steps 4 and 5 to keep the final contrast.
If you're thinking of buying acrylics but you're not entirely sure yet, stop that hesitating and get them.
Another possible result.
I guess that's it for today and for this tutorial. If you have any questions, I'll be happy to answer them.
If you recreate this sort-of-tie-dye, definitely let me know (even in the comments), I'd love to see it! :)
Wednesday 11 September 2013
NOTD - Raspberry Burberry
Hi! This time a recreated a manicure I did in May. Back then I did regular burberry nails, I used black and red gel pens, nude base. This time I changed the colour scheme and used acrylics instead, I wanted to know the difference.
I freehanded the whole thing, so it's imprecise. Like, really imprecise, I guess you should keep some distance to like the way it looks.
I freehanded the whole thing, so it's imprecise. Like, really imprecise, I guess you should keep some distance to like the way it looks.
Sunday 8 September 2013
Irradiated Tie Dye
Hi! In previous post, I mentioned buying a glowing top coat and of course I couldn't wait to use it in a full manicure. I did a bit of testing on fake nails and figured, that the best colours to use it on top of are white, yellow and mint. And what design goes perfect with these colour and glowing? Tie dye! Or, you know, my version of tie dye, which is not really tie dye, but I don't know what else to call it.
Wednesday 4 September 2013
Houndstooth 3 in 1 (+tutorial)
 |
| day 3 |
 |
| day 2 |
 |
| day 1 |
Subscribe to:
Posts (Atom)


